
Step back to a decade of unparalleled elegance and discover the secrets behind the most iconic 1950s hairstyles for long hair. The fifties weren't just about poodle skirts and rock'n'roll; it was an era where hairstyling was an art form, blending sophisticated structure with feminine softness. From the dramatic Victory Rolls that carried over from the 40s to the silver screen allure of Hollywood glamour waves, these styles possess a timeless quality that continues to inspire modern fashion and vintage enthusiasts alike. Whether you're preparing for a swing dance, a classic car show, or simply want to add a touch of retro chic to your look, mastering these hairstyles is essential.
This guide is your ultimate resource for recreating these classic 'dos with authenticity and flair. We will break down each look with clear, step-by-step instructions and provide practical tips for adapting them for today. To truly embody the timeless glamour of the 1950s, consider complementing your hairstyle with the perfect scent. You can explore a comprehensive guide to timeless fragrances for women to find your signature perfume for 2025. Furthermore, we'll even suggest which retrospec'd garments pair perfectly with each hairstyle, helping you create a complete, head-turning vintage ensemble. Get ready to transform your long locks into a masterpiece of mid-century glamour.
1. Victory Rolls
Though their origins trace back to the patriotic spirit of the 1940s, Victory Rolls remained a quintessential statement of glamour and sophistication throughout the 1950s. This iconic look features meticulously rolled sections of hair, usually framing the face, which curl upward and inward to create a distinctive, sculptural shape. A practical example would be actress Betty Grable, whose signature blonde rolls became a hallmark of the era. It's a key style in pin-up and rockabilly fashion, offering a polished yet bold aesthetic.
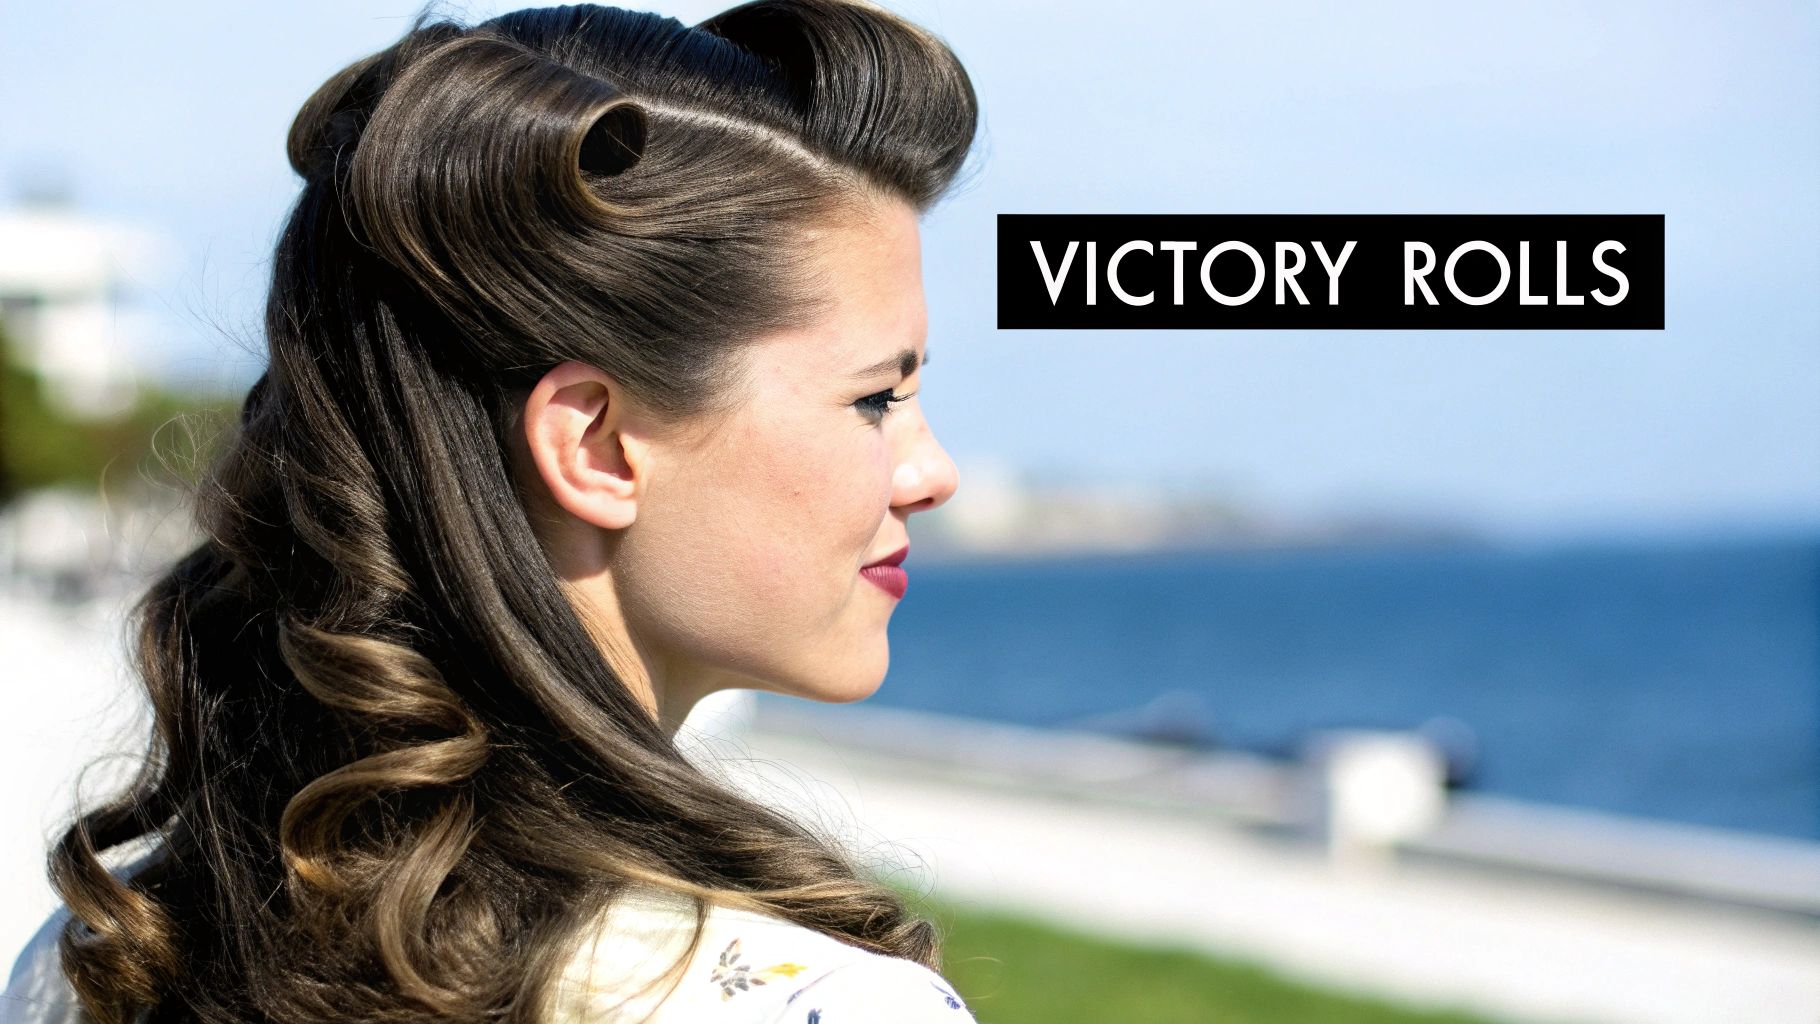
This hairstyle works exceptionally well for long hair, as the extra length provides the necessary volume and substance to create full, impressive rolls. Whether you're attending a vintage-themed wedding, heading to a swing dance event, or channeling your inner pin-up model, Victory Rolls are a guaranteed head-turner. They pair beautifully with the sassy silhouette of a classic wiggle dress like the Retrospec'd Greta Dress or a full-skirted ensemble, creating a cohesive and authentically vintage look.
How to Achieve Victory Rolls
Creating perfect Victory Rolls requires patience and a bit of practice, but the stunning result is well worth the effort.
- Preparation is Key: Start with day-old hair, as it has more grip than freshly washed hair. Apply a setting lotion or mousse to the sections you intend to roll to give them structure and hold.
- Section Your Hair: Create a clean side parting. Take a two-to-three-inch section of hair from the front, near your parting. The larger the section, the more dramatic your roll will be.
- Create the Shape: Backcomb the root of the section gently to build volume. Then, holding the end of the hair taut, begin rolling it around two fingers, moving downward towards your scalp.
- Secure the Roll: Once you have a neat roll, carefully slide your fingers out and secure it to your head using bobby pins. Insert pins from multiple angles (top, bottom, and sides) to ensure it stays in place all day and night.
- Finishing Touches: Repeat on the other side if you desire a symmetrical look. Finish with a generous spritz of strong-hold hairspray to lock everything in place and tame any flyaways.
Pro Tip: For a smoother, more defined roll, try rolling the hair around a foam roller or a hair donut before pinning it. This provides a solid base and makes it easier to achieve a uniform shape, especially if you're new to the technique. This style is a cornerstone of the rockabilly scene; explore more about how to get the rockabilly look on retrospecd.com.
2. Soft Finger Waves
While finger waves are often associated with the sharp, sculpted look of the 1920s, the 1950s saw a softer, more romantic evolution of the style. Soft finger waves feature gentle, S-shaped curves that flow through the hair, creating a sophisticated and glamorous wave pattern. This updated version was less severe, offering a touch of Hollywood elegance. A perfect practical example is screen siren Grace Kelly, who often wore her blonde hair in gentle waves that framed her face flawlessly.
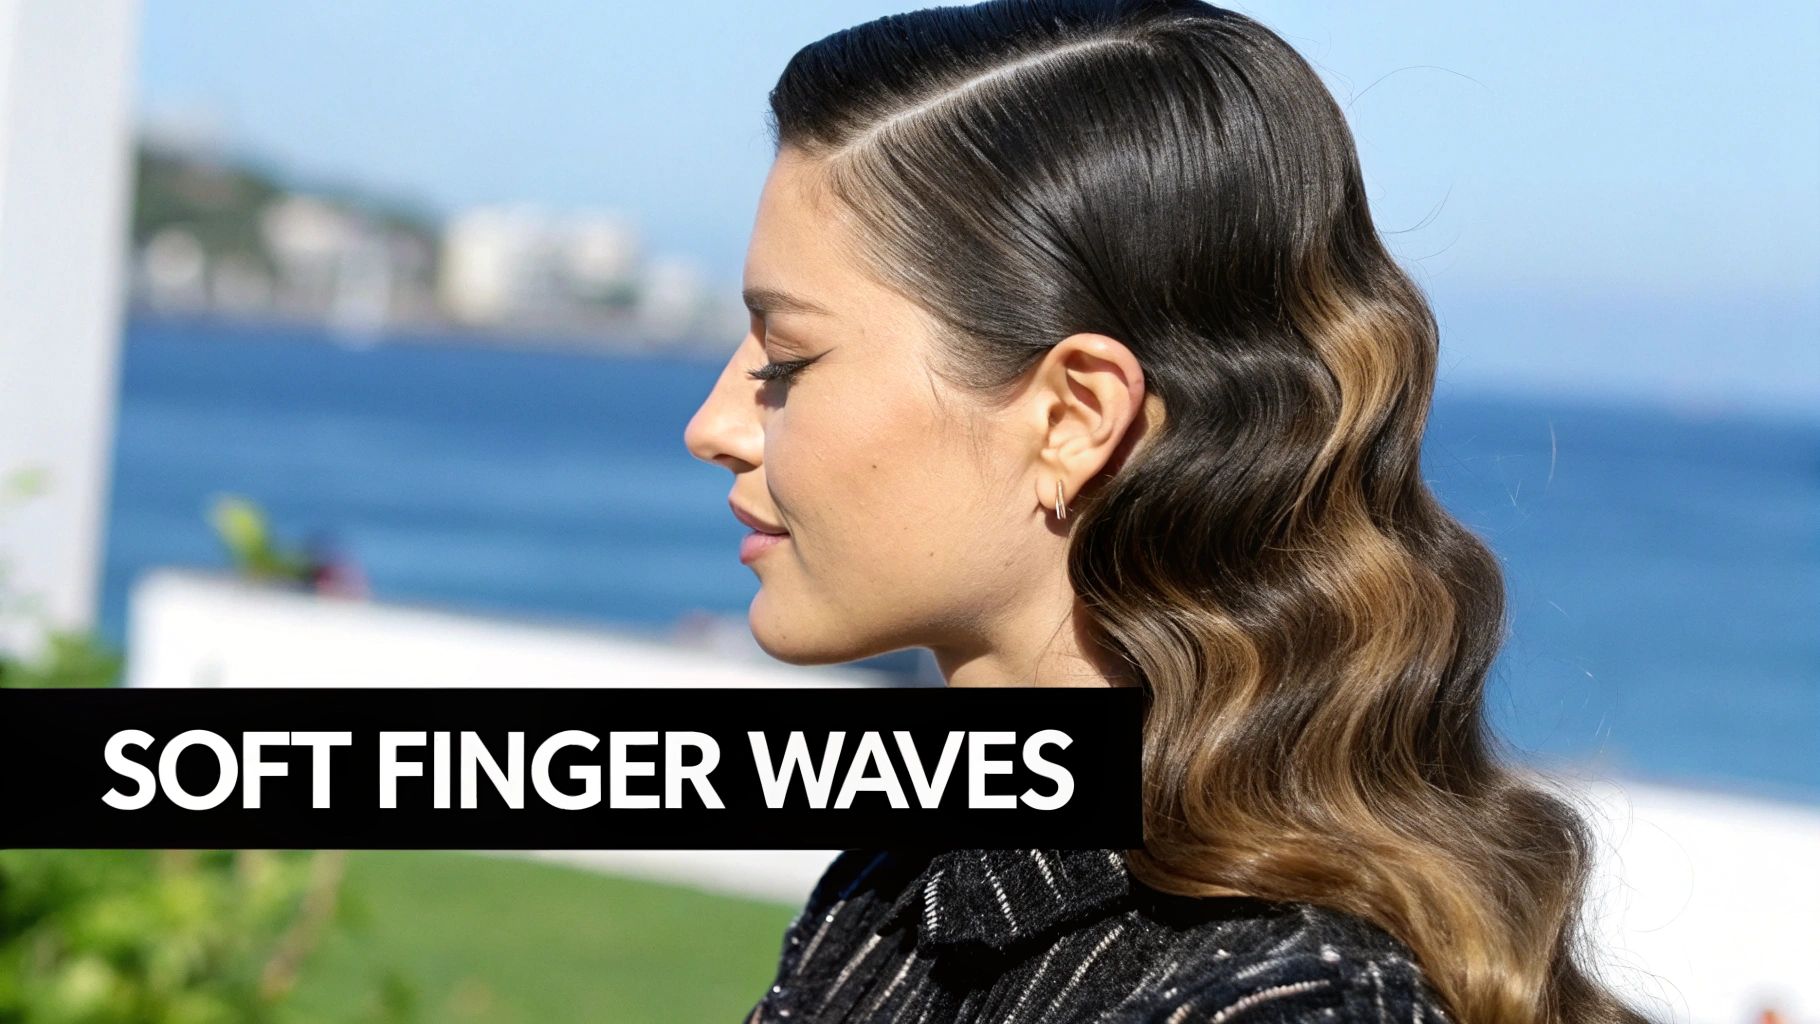
This particular style is one of the most elegant 1950s hairstyles for long hair, allowing the waves to cascade beautifully down the shoulders. The length adds weight and movement, making the waves look more natural and less constructed than their 1920s counterparts. It's an ideal choice for formal events, vintage-themed weddings, or a glamorous night out. This hairstyle provides a stunning finish to a sophisticated outfit, such as the elegant Retrospec'd Deanna Dress, enhancing its classic and refined silhouette.
How to Achieve Soft Finger Waves
Achieving these graceful waves requires precision and the right products, but the end result is a timeless look of pure sophistication.
- Prep the Hair: Start with clean, damp hair. Apply a generous amount of setting lotion or a strong-hold mousse from roots to ends. This is crucial for creating and holding the wave shape.
- Create the Waves: Using a fine-tooth comb, create a deep side parting. Place the comb flat against your head near the parting and push it forward about an inch. Place your index finger behind the comb to hold the ridge you've just created.
- Comb and Shape: Comb the hair from under your finger backwards, creating the "S" shape. Continue this pattern of pushing, pinching, and combing down the length of your hair section. Use wave clips or bobby pins to secure each ridge as you form it.
- Dry and Set: Allow your hair to air-dry completely or use a hooded dryer on a low setting. It is essential that the hair is 100% dry before you remove the clips, otherwise the waves will fall out.
- Finishing Touches: Once dry, carefully remove the clips. Gently brush through the waves with a soft bristle brush to soften the look and blend the sections together. A light mist of flexible-hold hairspray will keep the style in place without making it stiff.
Pro Tip: For very long hair, you can create finger waves around the face and crown, then set the remaining length in pin curls or with soft rollers. This combines the structured look of the waves on top with loose, flowing curls at the bottom for a truly glamorous, authentic 1950s finish.
3. Pin Curls Updo
The Pin Curls Updo is the epitome of 1950s formal elegance, a sophisticated style where long hair is transformed into an intricate arrangement of carefully placed curls. This look involves setting the entire head in small, tight pin curls, which are then artfully pinned up to create a structured and polished silhouette. A practical example of this style could be seen on Lucille Ball, whose vibrant red hair was often sculpted into elaborate updos for formal scenes in I Love Lucy. It was the go-to choice for any event demanding glamour and grace.
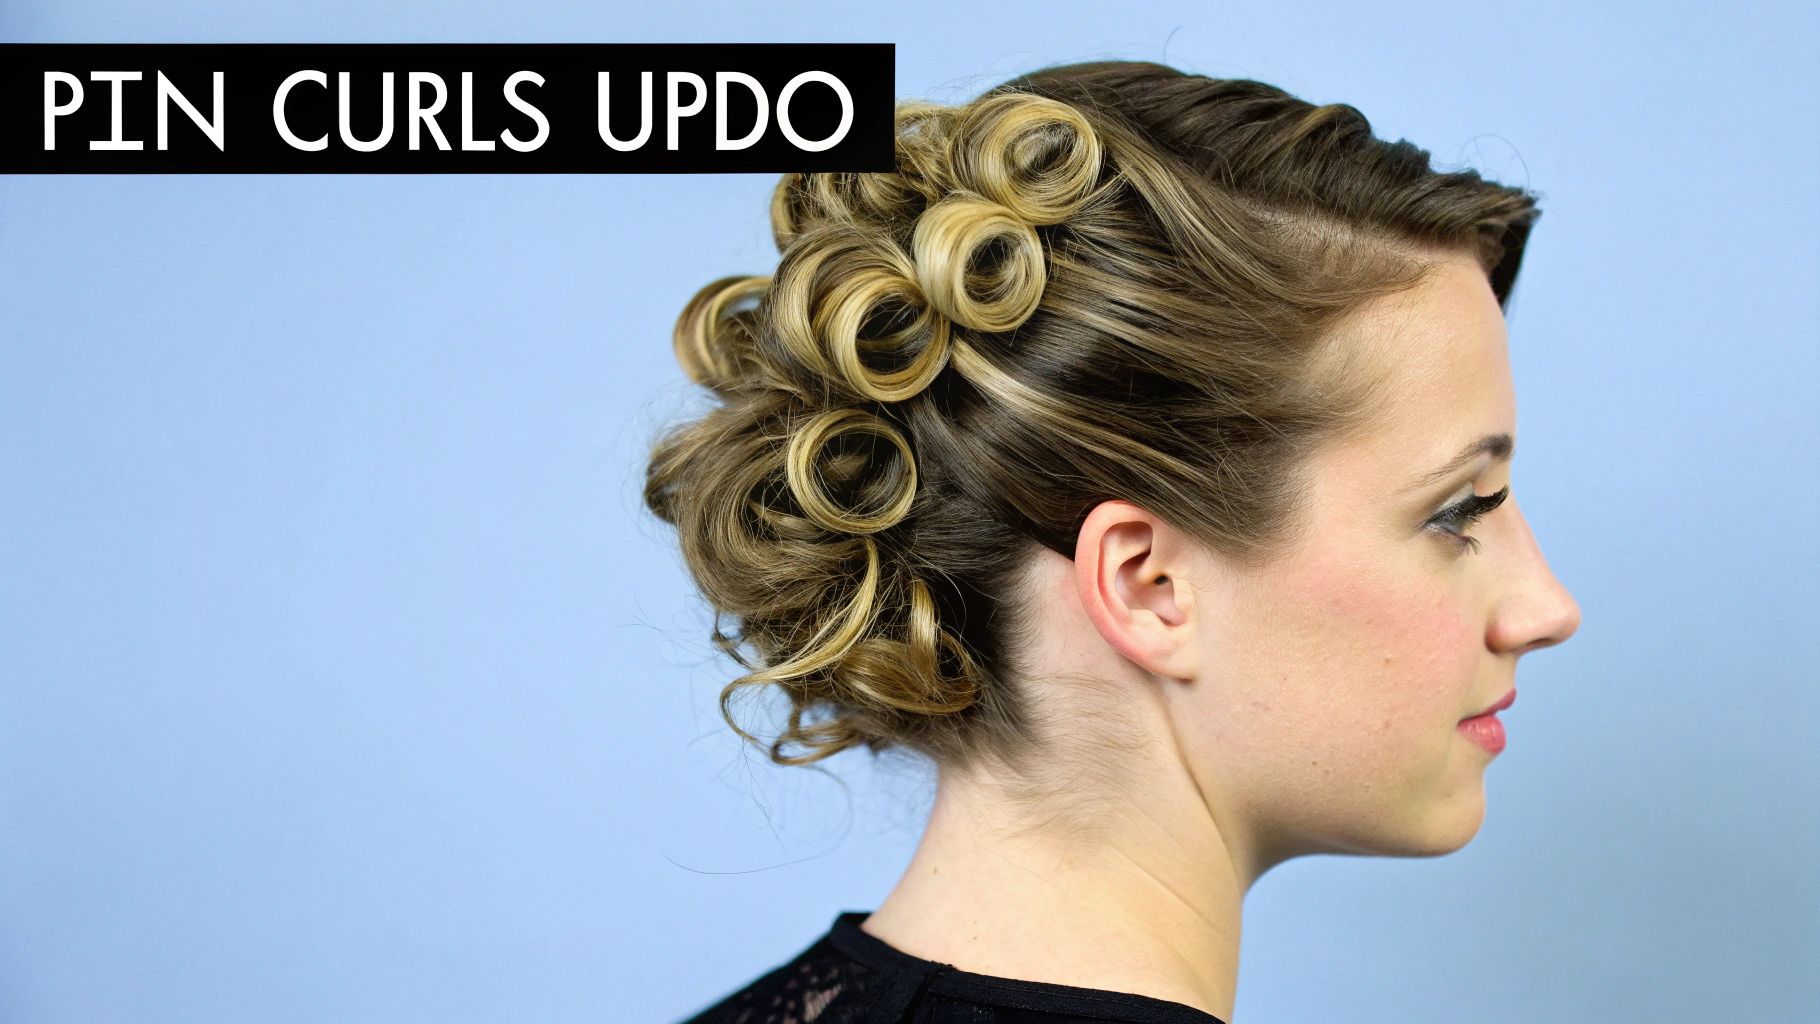
This hairstyle is a fantastic option for those with long hair, as the length provides the necessary volume and substance to build a full, elaborate updo. A Pin Curls Updo is perfect for weddings, formal dinners, or any occasion where you want to radiate classic sophistication. It pairs flawlessly with elegant evening wear, such as the glamorous Retrospec'd Kitty Dress with its dramatic off-the-shoulder collar, creating a head-to-toe look of authentic vintage refinement.
How to Achieve a Pin Curls Updo
While time-consuming, the Pin Curls Updo is a masterclass in vintage styling that yields breathtaking results. The key is in the preparation.
- Set the Curls: This style works best when the curls are set overnight. On damp hair, apply a generous amount of setting lotion. Take small, one-inch sections of hair, wrap them around your finger to create a flat loop, and secure the curl flat against your scalp with a bobby pin or clip. Repeat this process over your entire head.
- Release and Separate: Once your hair is completely dry, carefully remove all the pins. Gently separate each curl with your fingers, but avoid brushing them out completely to maintain their defined shape.
- Build the Updo: Begin pinning the curls up towards the crown of your head, starting from the nape of your neck and working your way up. Arrange the curls to cover the pins and create a seamless, voluminous shape. Don't be afraid to use plenty of bobby pins to ensure a secure hold.
- Style the Front: Arrange the front sections last. You can sweep them back smoothly into the updo or create softer, face-framing curls around your temples and forehead for a romantic touch.
- Finalise the Look: Once all the curls are pinned in place, give your hair a firm misting of strong-hold hairspray to lock in the style and smooth down any flyaways for a flawless finish.
Pro Tip: For a fuller, more dramatic look, try creating your pin curls in alternating directions (some clockwise, some anti-clockwise). This technique creates more texture and volume when you begin styling the updo, giving it a more luxurious and dimensional appearance. This style is a classic element of vintage fashion; get more inspiration on how to get the pin-up girl look at retrospecd.com.
4. Pageboy with Curled Under Ends
The Pageboy with Curled Under Ends is a classic 1950s hairstyle that exudes understated elegance and refined sophistication. This polished look features shoulder-length or longer hair that is smoothed down, with the ends curled neatly under in a uniform, C-shaped roll. It was the epitome of the well-groomed, feminine ideal of the era. A practical example is the look famously worn by television star Donna Reed, which symbolized the chic, put-together housewife of the decade.
This hairstyle is a perfect choice for those with long hair who want a neat, controlled yet glamorous look. The Pageboy offers a sleek silhouette that allows your facial features to shine, making it incredibly versatile for both day and night. It pairs beautifully with a collared blouse and pencil skirt for a day at the office or a sophisticated frock like the Retrospec'd Ava Dress for an evening out, creating a look that is both timeless and authentically 1950s.
How to Achieve the Pageboy with Curled Under Ends
Creating this smooth, structured style is all about achieving a sleek finish and a perfect inward curl.
- Start with Smooth Hair: Begin with clean, damp hair. Apply a smoothing serum or cream from roots to ends to combat frizz and create a silky-smooth base.
- Blow-Dry for Shape: Using a large round brush, blow-dry your hair in sections. Pull the hair taut as you dry, directing the nozzle downwards to keep the hair cuticles flat. As you reach the ends, use the round brush to turn the hair under, creating the foundational curve.
- Curl the Ends: Once your hair is dry and smooth, use a large-barrel curling iron or hot rollers. Take two-inch sections of hair and carefully curl just the bottom few inches inwards, towards your neck. Hold for a few seconds before releasing.
- Brush to Perfection: After curling all the ends, allow them to cool completely. Gently brush through the ends with a soft boar bristle brush. This will meld the individual curls together into one seamless, uniform roll.
- Set the Style: Finish with a light mist of hairspray to lock the style in place without making it stiff. The goal is a look that has hold but still retains natural movement.
Pro Tip: For an extra-sharp and long-lasting curl, pin the curled ends up in their rolled shape while they cool down. This technique, known as a pin curl set on the ends, helps the hair memorise the shape, ensuring your perfect Pageboy lasts all day.
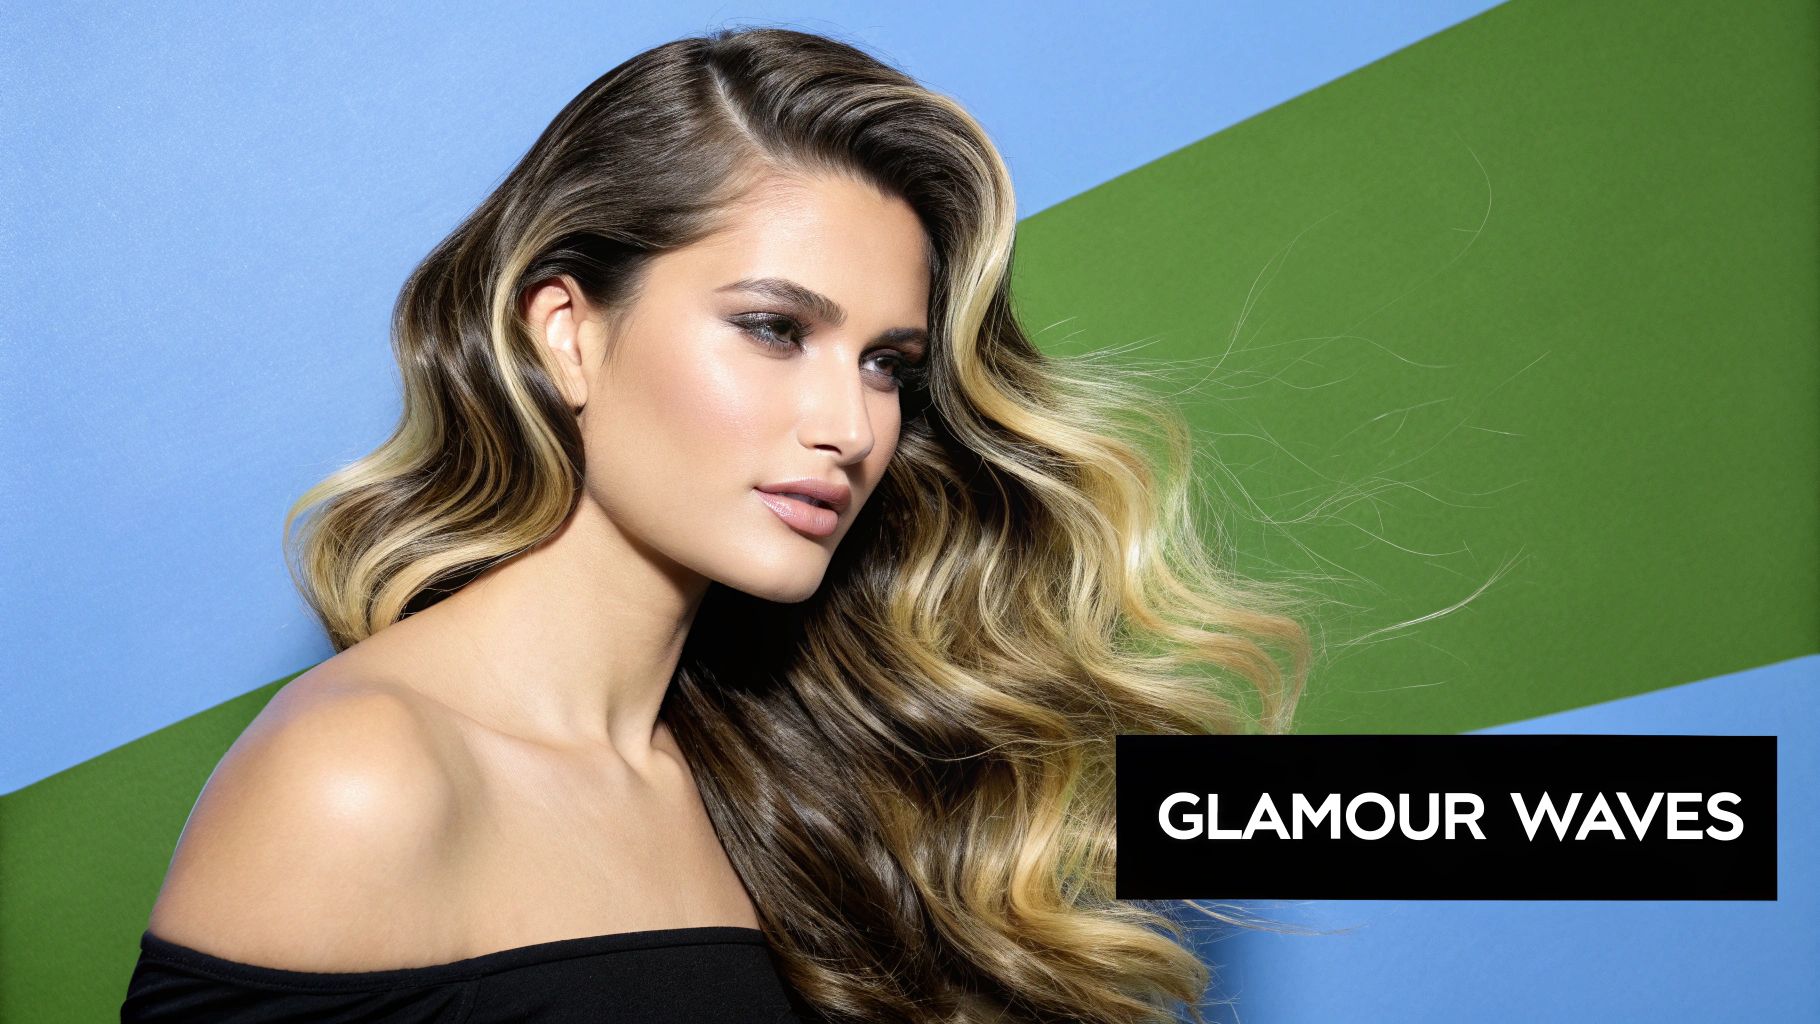
5. Hollywood Glamour Waves
Nothing captures the opulence of the silver screen quite like Hollywood Glamour Waves. This hairstyle was the epitome of 1950s elegance, popularised by icons like Elizabeth Taylor, whose raven locks were often sculpted into deep, luxurious waves. It features long, lustrous hair sculpted into large, uniform waves that often cascaded dramatically over one shoulder, creating a sense of luxury and sophistication that defined the decade's beauty ideals.
This particular style is one of the most beloved 1950s hairstyles for long hair because length is essential for creating that signature cascading effect. The deep, flowing waves create a look of polished perfection, ideal for formal events, weddings, or any occasion where you want to feel like a true Hollywood starlet. This hairstyle is the perfect complement to a show-stopping gown, such as the Retrospec'd Caterina Gown, enhancing its classic silhouette with timeless elegance.
How to Achieve Hollywood Glamour Waves
While this look appears effortlessly chic, it requires a specific technique to achieve its signature smooth, sculptural finish.
- Set the Foundation: Start with clean, dry hair. Create a deep side parting. Apply a heat protectant and a light mist of setting spray to each section before curling to ensure the waves hold their shape.
- Curl with Precision: Using a large-barrel curling iron (around 1.5 to 2 inches), take two-inch sections of hair and curl them all in the same direction, towards your face. This uniformity is crucial for creating cohesive waves rather than separate curls.
- Pin and Cool: As you release each curl from the iron, immediately roll it back up into its shape and secure it against your scalp with a pin curl clip. Allowing the curls to cool completely in this position is the secret to long-lasting hold and structure.
- Brush and Shape: Once all your curls have cooled, remove the clips. Using a soft bristle brush or a wide-tooth comb, gently brush through the curls. You'll see them start to meld together into the classic S-shaped waves.
- Final Polish: Use your fingers and the brush to further define the wave pattern. Finish with a generous application of a strong-hold hairspray and a touch of shine serum to tame flyaways and achieve that iconic glossy finish.
Pro Tip: For an extra-polished look, use duckbill clips to hold the "dips" of the waves in place while you apply hairspray. Let the spray dry completely before removing the clips to create deeper, more defined indentations that will last all night.
6. Bouffant with Long Back
Bridging the gap between the structured styles of the early 1950s and the voluminous trends of the 1960s, the bouffant with long back offered a dramatic yet soft silhouette. This look, practically pioneered by style icon Brigitte Bardot in the late '50s, features an impressively teased crown creating a high, rounded shape, while the rest of the hair is left to flow long and free. It’s a hairstyle that exudes both glamour and a touch of rebellious youthfulness.
This style is perfect for those who want to make a statement without sacrificing the beauty of their long tresses. The contrast between the sky-high volume at the crown and the sleek length at the back creates a captivating and sophisticated look. It’s an ideal choice for a cocktail party or a special night out, pairing beautifully with elegant and form-fitting dresses like the Retrospec'd Monica Dress, which features a sleek pencil skirt to perfectly balance the hairstyle's dramatic proportions.
How to Achieve a Bouffant with Long Back
Mastering the bouffant is all about building a solid, voluminous foundation at the crown.
- Section for Volume: Separate the top and crown sections of your hair, from your hairline back to the highest point of your head. Clip the front section forward and leave the back and sides down.
- Build the Base: Working with the crown section, take small, one-to-two-inch horizontal subsections. Using a fine-tooth comb, backcomb or tease each subsection at the roots, pushing the hair down towards the scalp to create a cushion of volume.
- Set the Height: Spray each teased section lightly with a strong-hold hairspray to lock in the volume before moving to the next. The more you tease, the higher your bouffant will be.
- Smooth the Surface: Once you have built sufficient volume, unclip the front section of hair. Gently comb this top layer back over the teased "cushion," being careful not to flatten it. The goal is to create a smooth, polished surface over the voluminous base.
- Secure and Finish: Use bobby pins to discreetly secure the smooth top layer into the teased base at the back of the crown. A final, generous mist of hairspray will ensure your bouffant stays lifted and in place all day.
Pro Tip: For extra height that lasts, try placing a small hair rat or padding underneath the top layer before smoothing it over. This provides internal structure and support, making the style more durable and easier to shape. Discover more tips for mastering your vintage aesthetic by reading about the secrets to pulling off the perfect vintage look on retrospecd.com.
1950s Long Hair Styles Comparison
| Hairstyle | Implementation Complexity 🔄 | Resource Requirements ⚡ | Expected Outcomes 📊 | Ideal Use Cases 💡 | Key Advantages ⭐ |
|---|---|---|---|---|---|
| Victory Rolls | Advanced; 30-45 mins; precise sectioning | Requires significant hair length, volume, strong-hold products | Dramatic, iconic vintage glamour | Special occasions, vintage events, theatrical | Eye-catching look, versatile, suits many face shapes |
| Soft Finger Waves | Intermediate to Advanced; 45-60 mins; technique-focused | Styling products, fine-tooth comb, setting lotion | Elegant, soft wave texture adding sophistication | Formal events, vintage-themed occasions, romantic dates | Timeless elegance, adds volume and texture |
| Pin Curls Updo | Expert; 2-3 hours or overnight setting; intricate pinning | Advanced skills, strong-hold products, many pins | Elegant, formal, intricate updo | Formal events, weddings, theatrical performances | Secure all-day hold, showcases hairstyling skill |
| Pageboy with Curled Under Ends | Beginner to Intermediate; 20-30 mins; straightforward styling | Large barrel rollers/curling iron, smoothing serum | Polished, classic, professional appearance | Professional settings, everyday wear, classic occasions | Easy maintenance, versatile, suits various face shapes |
| Hollywood Glamour Waves | Intermediate; 45-60 mins; requires skill with curling irons | Long hair, quality styling products | Glamorous, luxurious waves with high shine | Formal events, photo shoots, special occasions | Extremely glamorous, flattering, photograph well |
| Bouffant with Long Back | Advanced; 60-90 mins; extensive teasing and pinning | Strong-hold products, teasing comb, pins | Dramatic height and volume with flowing long back | Fashion events, dramatic occasions, vintage shoots | Adds fullness, dramatic presence, flattering for round/square faces |
Styling Your Way to a Fabulous Fifties Finish
Embracing the timeless glamour of 1950s hairstyles for long hair is more than a simple fashion choice; it’s an art form. From the architectural precision of Victory Rolls to the soft, cascading elegance of Hollywood Glamour Waves, each style offers a unique pathway to expressing individuality and sophisticated charm. This decade was defined by its commitment to polished, intentional beauty, a standard that continues to inspire enthusiasts today.
As you've seen, the core elements of these iconic looks are structure, volume, and a flawless finish. Whether you're mastering the tight spirals of a Pin Curl Updo or perfecting the sleek, inward curve of a classic Pageboy, the journey is one of practice and patience. Remember, the women of the fifties didn't achieve these styles by chance; they relied on techniques like wet setting, pin curling, and a healthy dose of hairspray to lock everything in place.
Key Takeaways for Modern Vintage Styling
To truly bring these looks to life, focus on the foundational elements that ensure their success:
- A Solid Foundation is Non-Negotiable: Healthy, strong hair is the canvas for any great vintage style. The volume and hold required for looks like the Bouffant depend on hair that is robust and full. To achieve the voluminous and intricate designs characteristic of 1950s long hair, a healthy foundation is paramount; exploring options like PRP hair rejuvenation treatments can help ensure your locks are vibrant and strong, ready for any glamorous style.
- Practice the Basics: Perfecting your pin curling and setting techniques is the most critical step. Spend time learning how to create uniform curls, as this will form the basis for everything from finger waves to elaborate updos.
- Invest in the Right Tools: A good rat-tail comb for sectioning, strong bobby pins, setting lotion, and a quality bristle brush for smoothing are your best allies. These tools are essential for creating that authentic, polished fifties finish.
- Don't Be Afraid to Modernise: While authenticity is wonderful, feel free to adapt these styles to suit your hair type and lifestyle. Perhaps your Victory Rolls are a little softer, or your Pageboy has a slightly less severe curl. Making the style your own is the ultimate goal.
Ultimately, recreating 1950s hairstyles for long hair is a celebration of a bygone era's glamour, translated for the modern world. It's about taking the time to create something beautiful and intentional, a look that stands out at a swing dance, a classic car show, or even just a special night out. Paired with a stunning Retrospecd wiggle dress or a full circle skirt, your hairstyle becomes the crowning glory of a complete, head-turning ensemble. You're not just styling your hair; you’re curating a moment of timeless elegance.
Now that you've mastered the hair, it's time to complete your look. Explore the collection at Retrospecd clothing to find the perfect vintage-inspired dress or separates to complement your fabulous new hairstyle. Visit Retrospecd clothing and step out in authentic fifties style from head to toe.